Sunday, July 5, 2015

JAXB Unmarshalling Example

1. Introduction

1.1 Apologies

Hey!

It's been a loooong time since my last post, so, first of all, let me apologize for this absence

The reasons:
  • The tiny OCAJP badge that you see in the right side of the blog (I will refer to this tin a forthcoming post).
  • I currently have limited time available.

1.2 Example's concept

What we 're gonna see today is how to convert an XML document to a Java Object. This (and the reverse - Java object to XML transformation) usually occurs when a software deals with Web Services.

2. The Example

We 'll here demonstrate how to convert an xml list of objects to a Java object. This can be easier using the JAXB Technology. JAXB stands for Java Architecture for XML Binding. It is used to convert XML to Java objects and vice-versa.

Environment used:
  • JDK 1.7
  • Eclipse Luna

I've the environment that I used, as from JDK versions 1.6 and later, the JAXB dependency is bundled into the JDK, in contrast with previous JDK versions, where you had to at least include the following dependencies onto your classpath: “jaxb-api.jar” and “jaxb-impl.jar”.

That is, we here don't have to include nothing at all.

Here is the project structure of this sample, a simple one as you can see, too:


2.1 The XML file

As I said, we 'll here deal with a smartphones list, so, just for demonstration purposes, two smartphones are here listed:

smartphones.xml
<?xml version="1.0" encoding="UTF-8"?>
<smartphones>
 <smartphone>
  <make>Samsung</make>
  <model>Galaxy Ace</model>
  <androidVersion>2.2</androidVersion>
 </smartphone>
 <smartphone>
  <make>Motorola</make>
  <model>Moto G 2014</model>
  <androidVersion>5.0.1</androidVersion>
 </smartphone>
</smartphones>

2.2 The Beans

Each smartphone can be described with a DTO class, so here it is:

Smartphone.java
package com.toubou91.jaxb.example;

import javax.xml.bind.annotation.XmlAccessType;
import javax.xml.bind.annotation.XmlAccessorType;
import javax.xml.bind.annotation.XmlRootElement;

@XmlAccessorType(XmlAccessType.FIELD)
@XmlRootElement(name = "smartphone")
public class Smartphone {

 private String make;
 private String model;
 private String androidVersion;
 
 // Getters and setters.
 public String getMake() {
  return make;
 }
 public void setMake(String make) {
  this.make = make;
 }
 public String getModel() {
  return model;
 }
 public void setModel(String model) {
  this.model = model;
 }
 public String getAndroidVersion() {
  return androidVersion;
 }
 public void setAndroidVersion(String androidVersion) {
  this.androidVersion = androidVersion;
 }
 
 @Override
 public String toString() {
  return "Smartphone [make: " + getMake() + ", model: " + getModel() + ", android version: "
     + getAndroidVersion() + "]" ;
 }
}

This is about a bean class containing JAXB annotations, in order to easily handle the properties we want to be traversed from/to XML. According to this When a top level class is annotated with @XmlRootElement maps a class or an enum type to an XML element (in our case,  the <smartphone> tag).

 @XmlAccessorType controls default serialization of fields and properties. That is, it allows us to configure the use of fields or properties to access the data in our domain object (Smartphone object). This is specified as an XmlAccessType (PUBLIC_MEMBER, PROPERTY, FIELD, or NONE) via the  @XmlAccessorType annotation. We use access type FIELD to cause JAXB implementations to create bindings for fields and annotated properties. So in our case all fields (make, model, androidVersion) are marshalled/unmarshalled by JAXB.

The toString() method has to be overrided in order to get a human-readable output format. Otherwise, for each object that will be manipulated, the output will be something like Smartphone@4bbc148 .

We obviously need a second class that holds a list of Smartphone objects:

Smartphones.java
package com.toubou91.jaxb.example;

import java.util.ArrayList;
import java.util.List;

import javax.xml.bind.annotation.XmlAccessType;
import javax.xml.bind.annotation.XmlAccessorType;
import javax.xml.bind.annotation.XmlElement;
import javax.xml.bind.annotation.XmlRootElement;

@XmlAccessorType(XmlAccessType.FIELD)
@XmlRootElement(name = "smartphones")
public class Smartphones {
 @XmlElement(name = "smartphone", type = Smartphone.class)
 private List<smartphones> smartphones = new ArrayList<smartphones>();
 
 public Smartphones() {}
 
 public Smartphones(List<smartphones> smartphones) {
  this.smartphones = smartphones;
 }
 
 public void setSmartphones(List<smartphones> smartphones) {
  this.smartphones = smartphones;
 }
 
 public List<smartphones> getSmartphones() {
  return smartphones;
 }
}

2.3 The Helper class

Let's create a helper class to easily unmarshalla requested XML file.

JAXBXMLController.java
package com.toubou91.jaxb.example;

import java.io.File;
import java.util.List;

import javax.xml.bind.JAXBContext;
import javax.xml.bind.JAXBException;
import javax.xml.bind.Unmarshaller;

public class JAXBXMLController {

 public static List<smartphones> unmarshal(File file) throws JAXBException {
  Smartphones smartphones = new Smartphones();
  
  JAXBContext jaxbContext = JAXBContext.newInstance(Smartphones.class);
   Unmarshaller jaxbUnmarshaller = jaxbContext.createUnmarshaller();
  smartphones = (Smartphones) jaxbUnmarshaller.unmarshal(file);
   
  return smartphones.getSmartphones();
  
 }
}

2.4 The Demo

Finally, let's test what we just created!

Demo.java
package com.toubou91.jaxb.example;

import java.io.File;
import java.util.List;

import javax.xml.bind.JAXBException;

public class Demo {

	public static void main(String[] args) {

		List<smartphones> smartphones = null;
		
		try {
			smartphones = JAXBXMLController.unmarshal(new File("src/smartphones.xml"));
		} catch (JAXBException e) {
			e.printStackTrace();
		}
		
		System.out.println(smartphones);
	}
}

3. Git repo

You can also find the corresponding source code in this github repo.

Saturday, April 11, 2015

How to change the default installation directory in Windows


1. The problem

I've got a partitioned ultrabook, where OS is installed in the C:\ drive. That is, my C:\ drive has a small amount of available GBs, so, each time I want to install a new software, I have to manually change the setup wizard's default directory ( C:\Program Files\ ) to my D:\ drive.

2. The solution

In order to change the default installation directory for a Windows machine, we have to modify its registry:
  • Start -> Run, type
     %systemroot%\syswow64\regedit
    and hit OK.

  •  Navigate to HKEY_LOCAL_MACHINE\SOFTWARE\Microsoft\Windows\CurrentVersion and change the highlighted variables (right-click -> Modify) with the desired ones:

Enjoy!

Sunday, March 22, 2015

How to solve Failed to execute 'send' on 'XMLHttpRequest': Failed to load [filename]

So, the other day I was writing my AngularJS Routing Example for the WCG community and I suddenly got in a kind of trouble: I couldn't seem to get it working!!!


My app's critical point was that I was trying to deploy an app that included ng-view, to a browser.

By default, a browser doesn't allow AJAX requests to files located on your local file system. This happens for security reasons. But, ng-view uses an AJAX request to load templates, so the options are:

  • Configuring your browser in order to allow local files access; (this link explains how to implement this action in Google Chrome)
  • Run your app in a local web server.

The first option is quite straightforward, so I'll stick with the second one. I recommend users that don't have locally a web-server, to go for an open-source solution, like http-server, which can be configured very easily.

I'm a Java lover and I have installed one distribution of Tomcat in all of my working instances, so the following demonstration is about running an Angular app to Tomcat:

  • Copy or move your app's folder to Tomcat's /webapps folder and execute:

  • Navigate to Tomcat's /bin folder and execute the startup script:


  • Verify that Tomcat deployed your app:

  • Access your app from Tomcat, you should have a clear console now:
Cheers!

Tuesday, March 10, 2015

Beautifying Javascript's default alerts with sweetalert

Ok, I was in the middle of my upocoming (scheduled for the 17th of March) AngularJS Form Validation example for the Web Code Geeks (WCG)  community, using Twitter Bootstrap and AngularJS and I was quite excited about that, but still my sample app didn't look so beautiful.

What resulted to this condition, was the fact of the deprecated JavaScript's default alert functions, so after a quick search, I found out that sweetalert matched my needs.

SweetAlert is not a jQuery plugin, but a combination of JS, CSS and some images, which together, produce a very catchy product that every front-end developer would love making use of.

What to include in your project in order to use it

All you have to do, in order to use these fancy alerts in your projects, in to download the package from the fore-mentioned link (or just the lib folder) and reference the JavaScript and CSS files manually:


How to use it

A simple alert:
swal("Hello World!");
An error message - the arguments' order is: title, text, message type:
swal("Oops...", "Something went wrong!", "error");

Using sweetalert in a real project

A good starting point would be this repo of mine, where I'm implementing an AngularJS form validation app, using Bootstrap and sweetalert.

 You will be able to read about the project's analysis (from Angular's perspective) in a week, as this is an example that will be published in WCG, as I fore-mentioned.

For the moment, here are the product's screenshots from the successful and erroneous app's alerts:

Success alert

Error alert
Cheers!

Tuesday, January 13, 2015

Create your own movie database easily with SmartMovieDB!

You can directly jump to the git repository that hosts this project :)


There's a pretty nice source over the internet, regarding the creation of your own movie database.
You can read in detail its usage and functionality over the fore-mentioned link, but, generally, the following schematic explains how it works:

That is, you give as an input a text file that contains the desired movies' names and with the help of the perl scrapper, you get an output of an sql format with all the sql commands that need to be done to your database.

This means of course some extra effort, so why don't we go for an automatic process? What about an sql script runner, which takes as an input an SQL file, connects to the specified database and runs the generated from the scrapper script, queries?  It would be nice if we could stick with Perl, but I didn't had the luxury to waste a lot of time on Perl-MySQL connection, so I chose the easy way, which is Java and fortunately, there is an easy way to do it, again with the support of an open source project (we 'll here need only one part of it, as you noticed, too).

I'm choosing to start with the Java project, which is responsible for reading an sql file and executing the included queries to a given database connection:


  • DatabaseConnection.java defines a valid database connection.
  • ScriptRunner.java is responsible for the convertion of sql statements into databse queries.
  • MainClass.java coordinates the game, as the script runner's instance needs a connection argument, which is actually passed by calling the getConnection() static method of DatabaseConnection.java
And that's is! We 're good to go with the script runner's part.

What is left now, is to find a way to connect the script runner (that takes an sql file and executes the existing queries into a db) with the perl scrapper.

According to the scrapper's part, I'd firstly like to introduce a small parenthesis: I support open source software, so I'm here using the OMDB Api, instead of the iMDB's API, so, together with some updates that had to be done to the scrapper script, here is the updated version of getMovieData.pl:

#!/usr/bin/perl -w
use strict; 
use XML::Simple;
use Data::Dumper;

my $xml = new XML::Simple;

die "Please make that you the movie title is provided into quotes!\n" if(!@ARGV);
my $movie = shift;
$movie =~ s/\s/+/g;

my $cmd = "curl http://www.omdbapi.com/?t=$movie&y=&plot=short&r=xml";
my $movieData = `$cmd`;
my $data = $xml->XMLin( $movieData );

my $released = escapeSingleQuote($data->{movie}->{released});
my $rating = escapeSingleQuote($data->{movie}->{imdbRating});
my $director = escapeSingleQuote($data->{movie}->{director});
my $genre = escapeSingleQuote($data->{movie}->{genre});
my $writer = escapeSingleQuote($data->{movie}->{writer});
my $runtime = escapeSingleQuote($data->{movie}->{runtime});
my $plot = escapeSingleQuote($data->{movie}->{plot});
my $imdb = escapeSingleQuote($data->{movie}->{imdbID});
my $title = escapeSingleQuote($data->{movie}->{title});
my $votes = escapeSingleQuote($data->{movie}->{imdbVotes});
my $poster = escapeSingleQuote($data->{movie}->{poster});
my $year = escapeSingleQuote($data->{movie}->{year});
my $rated = escapeSingleQuote($data->{movie}->{rated});
my $actors = escapeSingleQuote($data->{movie}->{actors});

my $tstamp = time();

print "INSERT INTO movie_collection VALUES (NULL , '$title', '$year', ";
print "'$rated', '$released', '$genre', '$director', '$writer', '$actors', '$plot', ";
print "'$poster', '$runtime', '$rating', '$votes', '$imdb', '$tstamp');\n";

sub escapeSingleQuote {
 my $str = shift;
 $str =~ s/\'/\\'/g;
 return $str;
}

Once the sql file creation is done , we 'll make a system call from Perl to run the exported jar file of our Java project. This means that we need to add the following line in the end of the batch.pl script:   
#!/usr/bin/perl
while(<>){ 
 my $cmd = "perl getMovieData.pl \"$_\""; 
 system($cmd);
}
system "java -jar absolute/path/to/the/exported/jar/file.jar"
Finally, everything is fired up from command line, so, keeping in mind the exact locations of the required files (movies list, jar and generates sql's file), execute the following command:
perl batch.pl movielist.txt > sqlInserts.sql

For more details, there's also a git repository that hosts this project :)

Monday, December 1, 2014

How to solve Error parsing XML: unbound prefix for com.facebook.widget.ProfilePictureView in Android

Hey people,

these days I'm working with Android Facebook SDK, a field that I'm pretty new, too, so I considered sharing a little experience that I recently faced.

Supposing that you want to connect your app to Facebook, you obviously need a login button, first of all., so your xml code should look like this:


Ok, nothing special, but if you want to add the user's profile picture too, see what happens:

Error parsing XML


And this is what the console logs:

C:\Workspaces\eclipse_luna\FacebookApp\res\layout\activity_main.xml:14: error: Error parsing XML: unbound prefix

So, if you 've already read that, but didn't find a solution, here is the single line that you need to your namespaces:
xmlns:facebook="http://schemas.android.com/apk/res-auto"

Now, everything seems to work, without any errors:


Cheers!

Sunday, November 30, 2014

How to install Perl and cURL on Windows

Hello!

Perhaps you 'll never need Perl, but when you are about to do it, you obviously don't want to mess with cygwin and stuff like that.

I actually found a simple solution to get it up and running in about 5 minutes, together with cURL installation, without configuring anything on your environment, but only running the .msi installers.

If you don't actually know it, Strawberry Perl is the most stable version for Windows, so:


  • Visit Strawberry Perl site.
  • Download the version that matches your system (I'm on a 64-bit machine):

  • Run the installer.

The installer automatically places the Perl directory under the correspong Program Files folder (so, for me, it is under "Program Files", but if you selected the 32-bit version of it, it should place it under "Program Files (x86)".

It also adds the perl executables to your system path, by default.

  • Validate the successful installation of Perl, to your system: 

I suppose the only reason for someone to start using Perl in 2014, is related to web technology, i.e transfering data by using different protocols. An easy way to do that, is by using the cURL tool.

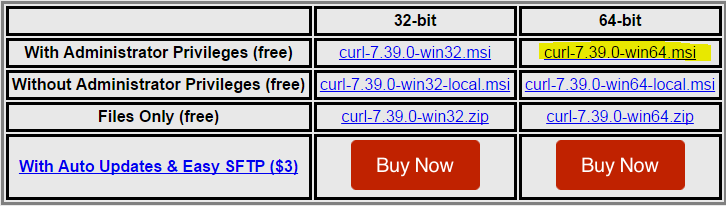
While on my investigation to do this without having to use cygwin or my cmd, I found this site, that also provides an .msi installer in a reliable way, like the one we 've used for Perl (the highlighted version is what worked for me):


So, when the installation is finished, you just have to validate that you 're good to go:


Cheers!